-
-
-
- User interface versions
- Building blocks for user interface design
- Adding styles with a css
- Surrounding page
- Changing snippets
- Creating a custom login page (pre 3.4)
- Creating a custom login page
- Using velocity templates within the blueprint
- Create your own web pages
- HTML delivery requirements
- How to customize system mails
-
-
- Introduction to security
- Secure development
- Security certification
- Field properties concerning security
- Developing user groups securely
- Security considerations for user interface
- Secure file organization
- Securely using the request
- Cross Site Scripting (XSS)
- Other options concerning secure development
- Security analysis
- Secure deployment
- Secure application management
- Scrambling of testdata
- Anonymization of personal data
- Using robots.txt
- Permission settings
- Security measures
- Data encryption
-
- Search Engine Optimization
- OTP
- User Interface migration guide
- User account management
- Instructies voor implementatie van visueel editen van nieuwsbrieven
- Login as another user
- Support
- More information about moving to User Interface Version 4.0
- Standaard page layout
- Sections moved to layout
- Aanpassingen in release 2024-7
- Media library
- Aanpassingen in release 2024-10
- Analytics and Matomo
- Registration forms
- How to change names of classes and fields?
- Responsible Disclosure Policy
- How to upload a blob in Velocity?
- Aanpassingen in release 2024-2
- Instances
- Google Analytics
- Street and City helper (postcodecheck)
- Responsible disclosure-beleid
- Postcode check service (straat en huisnummer) kosten
- Expressions
- Regular Expression Reference
-
Facebook authentication
How to set up Facebook authentication using OAuth 2.0.
Steps to Authenticate User
Step 1. Create a facebook application and register your application urls.
Create a Facebook Application for your website domain at https://developers.facebook.com/apps and press "Create New App".
Just fill in the dialogs and you will end up here:

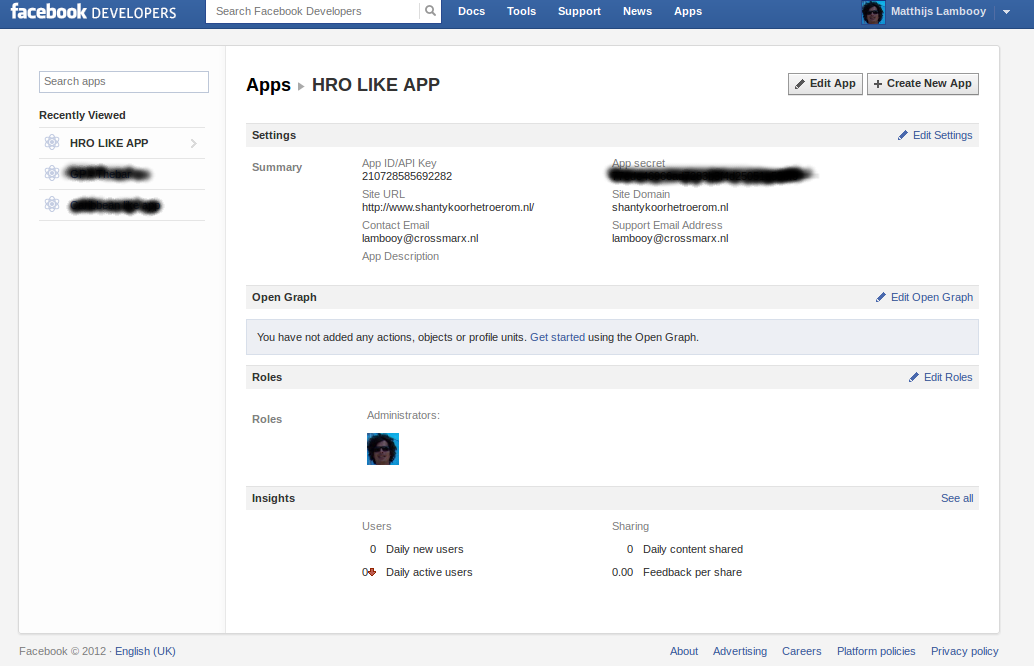
Fill in the site urls.
Read more on facebook logon.
Step 2. Save your API Key and Secret Key
After registration, you will receive a unique API Key and a Secret Key. API Key helps us identify your application and lets you make API calls. For the safety of your application please do not share your Secret Key.
Step 3. Store API Key and secret key in your CrossmarX application blueprint in the Application Management screen.
Step 4. Call the login url
Use /engine?service=session&cmd=sociallogin&provider=facebook.
Step 5. Authorize user goups to login with facebook, using the property "Allow social login".
How does it work?
When a person uses the facebook login, and the email address of this user does not exist in a current account, a new account is created. When the email address does exist, the facebook account will be connected to the current account, after the user has responded to a confirmation email.
More options
If a user is alread logged in using a login name and password, it is still possible to connect the current account to facebook. You can facilitate this by providing the followig url:
/engine?service=session&cmd=connectaccount&provider=facebook.